Fix Wall Tiles
Preparation
Preparation is a necessity if you wish to have a clean, strong and long lasting installation. Make sure the walls are flat, smooth and dry.
Priming
The floor should be primed, using an acrylic bonding priming agent or PVA, this is used to seal in any residual dust and makes the floor more tacky and easier for adhesion.
Marking
The simplest way to start tiling a room is to plan out how the tiles will spread across the room, trying to get the best fitting pattern and layout, ‘best’ meaning the way with the least amount, less tricky and better looking cuts.
Fixing
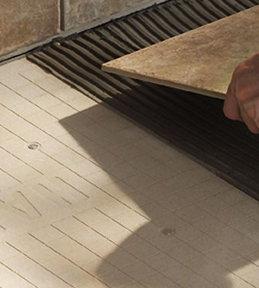
Using a 6mm notched trowel, you should spread adhesive across the wall, making sure to keep the spreading even, and not to exceed your work rate. Press a tile into the adhesive and press down on it, twisting and sliding the tile into the adhesive to create some suction and to ensure the backing of the tiles are in full contact with the adhesive.
Spacing
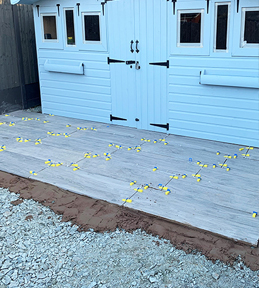
Cross Spacers should be used to make sure each tile joint is even across the entire wall, which will make it easier to tile and make the room look professional. Spacers should be place at the corners of a tile, before placing another tile adjacent to it, pressing the tile close up to the spacers to ensure the gap is no bigger than the space allows.
Cutting
When it comes to cuts, we would suggest using a good quality cutter, preferably a score and snap cutter. Be sure to keep the sharp, cut edges, towards the edge of the room, to ensure there are no sharp lips visible. For awkward cuts, around door frames etc, tile nippers can be used to nip away the exact shape needed to fit the tile into place, this may leave a rougher edge than a wet cutter, but will leave less mess, and is a lot simpler.
Beware Lipping
We suggest you regularly check with a spirit level, that the tiles are lying perfectly flat, this will eliminate chances of some tiles ‘lipping’, where the side of the tile may become visible, and can ruin the look of the wall.
Large Tiles
On Large Format tiles we Recommend not to do a half bond pattern. By doing a 50% offset, where the middle of a tile is exactly in line with the grout joint of the next row, you maximize the amount of unevenness, or lippage, between the tiles. Therefore, it is best not to lay them with a 50% offset but instead use the industry recommendation of an offset of no more than 33%.
Cleaning
As you tile, any excess adhesive should be cleaned off immediately with a sponge or damp cloth etc, if it sets, it will be a lot harder to remove. Adhesive residue should also be removed from the tiles surface by washing the tiles before grouting.
Waiting
Leave the walls as long as the adhesive instructions specify, but we would say to leave the floor 24 hours before grouting, this is to allow the adhesive to go off completely.
Grouting
Mix the grout as per the bags instructions, being careful again, not to exceed the rate at which you can grout. Completely fill the joints with the grout, covering the spacers and being sure to not leave any gaps.
More Cleaning
As you grout, remove excess grout from the surface of the tile with a sponge or damp cloth, especially if the tiles are natural stone and the grout is dark, staining is a big danger In this case, be careful not to let it dry.
Finishing
To finish the joints, and give them a great looking finish, we recommend using a grout finishing tool to score down the joints and make sure the grout doesn’t stick out of the joints.
Dusting
When the grout dries, there is a residual mist left on the tiles surface, this is easily buffed off using a dry cloth or rag. We would suggest wearing a dust mask to prevent inhaling the grout residue.
We also recommend wearing some protective clothing, Gloves and Goggles would be recommended during cutting and tiling.


